This is a tutorial to create a memory game using Scratch 2.
This memory game is played this way: The “computer” will press a random button and then the player must click the same button. In the next round, the computer will press that same button plus another random button. The player must then mimic the same sequence. After each round, another random button is added and the sequence will get longer. The game ends when the player click the wrong button.
Creating the buttons
Let’s start by creating a new project on Scratch. We will remove the default sprite (the cat) and replace it with a button for the game. You can of course choose a different sprite or even create your own sprite.
Delete the default sprite
Choose sprite from library
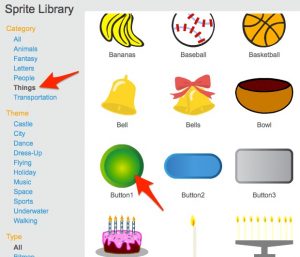
Choose a button sprite
We will first write the script for animating the button when it is pressed.
For the button pressed animation, we will do the following
- move the button in the direction down and right a little bit
- increase brightness of the button
- play a note briefly
- return button to original position
- change back to original brightness
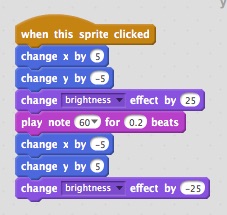
Button Animation
This button will animate when player click on it. But we will also need it to animate when the “computer” is playing, so instead of attaching the blocks under “When this sprite clicked” block, we attach them under “When I receive” broadcast block, so that we can reuse the animation instead of creating duplicate blocks. Then under “When this sprite clicked” block, we just broadcast the message to trigger the animation. This way, we can always broadcast the message whenever we when the button to be pressed (animate).
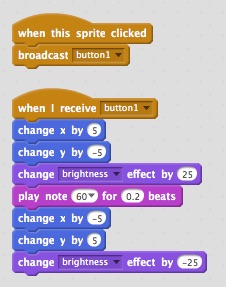
Button animation with broadcast message
For the message, we’ll just use “button1” because this is the button 1. Later on, when we duplicate this to create other buttons, we will need to change the message for each button. Test by clicking on the button to make sure the animation still works.
Setting up the Game Play
Switch to the stage script. The following script must not be attached to the button, since this will be the main script for the game, so we attach it to the stage.
First, we will need to make a list to hold the list of numbers that will be the sequence of button to be pressed (played). Let’s name this list “sequence” and ensure that this list is clear at the beginning of the game.
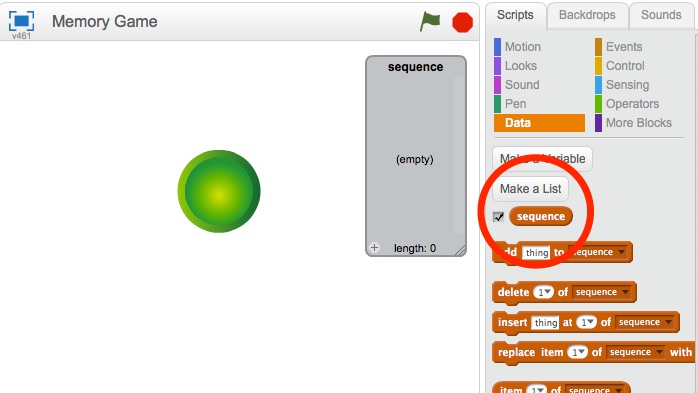
Create a list
At each round of the game, we will add a random number (the number of the button) to this list. Since the computer and player will take turn to play the button, we will need a variable to indicate whose turn it is to play. So let’s create a variable for this, let’s name it “isPlayerTurn“. We will set the value for this variable to 1 to mean it is the player’s turn, and 0 to mean it is the computer’s turn.
We will start the game with the green flag. At the start of the game, it should be the computer’s turn, so let set “isPlayerTurn” to 0.
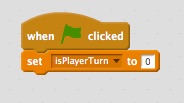
Set isPlayerTurn to 0
The game consists of loops of rounds where computer and player takes turn to press the buttons. We need to indicate when the game ends (to end the loop). For this, let’s create another variable, call it “gameover” and set it to 0 at the beginning of the game. The value 0 means is not game over yet, and the value 1 will mean game is over.
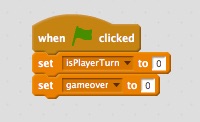
Set gameover to 0
Now we create a loop that will run until “gameover” is not 0. When the game ends later on, we will set “gameover” to 1, so for this loop, we can use repeat until “gameover” > 0.
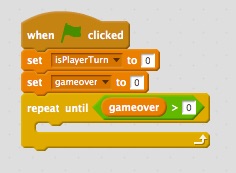
Main loop of the game
Below are the list of things that need to happen inside the loop
- Choose a random button and add it to the sequence
- Computer will play (press) the buttons according to the numbers in the sequence
- Set player’s turn
- Wait until player’s turn is finished (player is done pressing the button) or game over (player press the wrong button)
- If not game over, repeat the loop
At each loop (round), we will insert a random number to the sequence. The random number correspond to the button that will be played, so this random number must not be greater than the number of buttons we have. Currently, we only have one button, but let’s just program it for 4 buttons (we will duplicate our first button later to create the other 3).
Next, we will loop over the items in the sequence, and press the buttons accordingly. For this inner loop, we will need a counter to retrieve each item in the sequence. Create a variable called “counter” and set it to 1 before each loop. Inside this inner loop we will also broadcast the message to press the button.
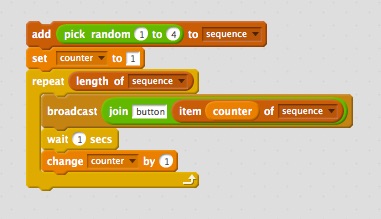
Computer’s turn to play
Also, at each round, we must wait for the player to press the button, otherwise it will just keep looping without giving the chance for the player to play. So before the end of each loop, we must turn “isPlayerTurn” to 1 and then wait until it’s the computer’s turn again (“isPlayerTurn” is 0).
The complete main loop will now looks like below.
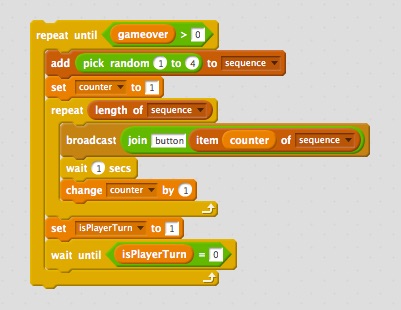
Game’s main loop
Updating the button’s script for the player’s turn
Now if we test the game, the computer will play (pressed) 1 button, and then wait for the player to press a button (wait until “isPlayerTurn“=0). It is now time to go back to our button script to set this variable.
We will look at the script under “When this sprite clicked” block. Earlier we have put broadcast message “button1” when this sprite is clicked. We have to modify this slightly now. We will first have to check whether it is the player’s turn to press a button. We do not want the player to be able to press the button when it is still the computer’s turn to play. So we add an if block.
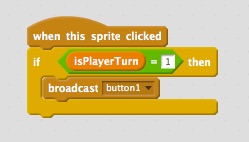
Add an if block to check if it’s player’s turn
Now, the player’s turn only ends when the player has clicked the same number buttons that the computer played earlier. The number of buttons that the computer played is the same as the number of items (the length) of the list “sequence“. We will now need another variable to count how many buttons has the player pressed. Let’s name this variable “n“. We will increment this “n” variable by 1 everytime the player click a button.
Next we will check whether the button that the player pressed is the correct button. We do this by comparing the current button number that the player pressed with the “n“-th item in the “sequence“. If they are the same, then it is the correct button, otherwise, it is the wrong button and we should set game over.
If it is the correct button, we then check whether “n” is the same as the length of “sequence“. If it is, then we set “isPlayerTurn” to 0.
So for the first button (which we named button1), the script should look like this.
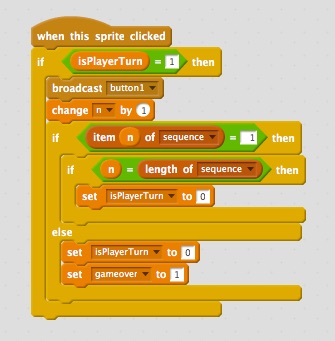
Complete button press script
Before we duplicate this button, we need to remember to initialize the value for “n“. “n” should be 0 at the beginning of player’s turn, and must be reset every time the player is about to start his/her turn. The best place to do this is right after the computer finish its turn. So let’s go back to the main game loop again (in the stage script window) and set the value for “n” to 0 just after computer finished its turn.
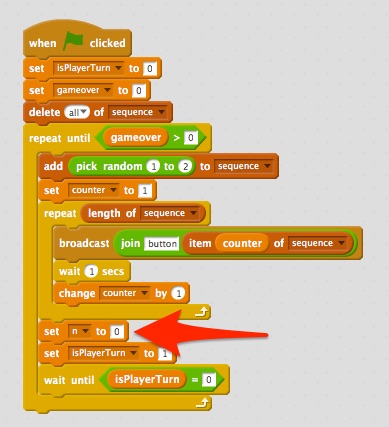
Insert the block to set n to 0
Duplicating the buttons
Now we can duplicate button1 to make three other buttons. Right click on the button sprite and click duplicate.
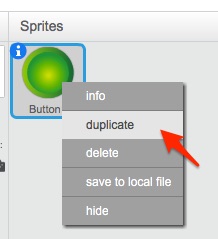
Duplicate button
Rename the duplicated button to button2 and change the color (using the sprite painter under the costume tab).
Next, we need to slightly modify the script for this button2. We need to make changes at 3 places. The first 2 places is the broadcast message. Instead of button1, it should be button2 now. The other place we need to change is the comparison of button number to the item in the “sequence“.
Actually, you might also want to change the note that is played, so that each button will play different note. This will help to make the game easier to play.

Script for button2
Duplicate the buttons two more times to create button3 and button4. Each time change the colors and the script just like we did with button2.
We should also arrange the buttons nicely on the stage. For example we can arrange the buttons to look like this.
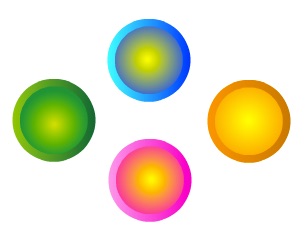
Buttons arrangement
Of course you can arrange them in any other way you like.
Now when we test the game for a couple of times, we will find that something is not quite right. I suggest that you turn on the display for all the variables and list when doing testing to see if something is wrong.
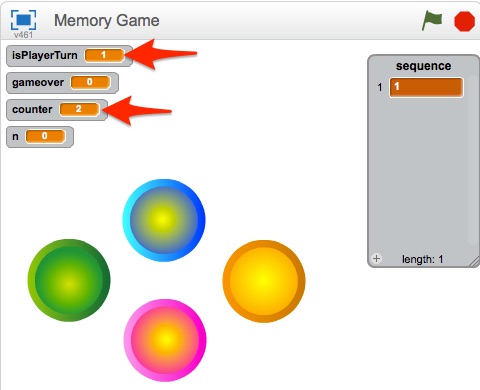
Display of variables
By looking at the variables values during different stages of the game we will find that we have forgotten to initialize the value for variable “counter” and ensure that list “sequence” is empty at the beginning of every game. You may also notice that after player finishes his/her turn, the computer immediately start its turn without any pause, which maybe confusing. We will fix this by adding a wait just before the end of the loop.
The updated main loop of the game (on the stage script window) should now look like below.
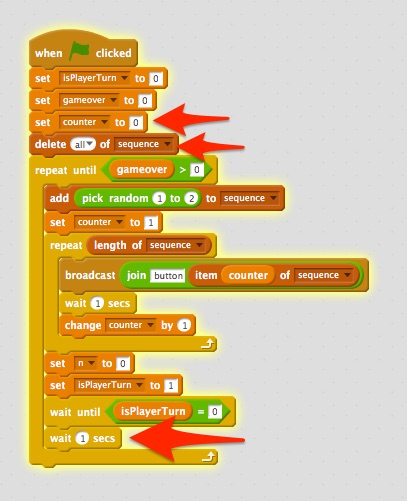
Updated main loop
Adding scoring system and handle Game Over
Now if you test the game, it should work fine. But there’s at least a couple of other things that we should do to make the game more complete.
- add a score (e.g 1 score for each level/loop)
- display some notification (e.g. with text/sound) when the game is over.
Let’s add the scoring system. First we need to create a variable “Score“, which we will initialize to 0 at the beginning of the game. Then we will increment the “Score” whenever a player finish his/her turn. We can do this at the button scripts, but then we will have to do it on each button (4 buttons in this case). A better way is to do it at the main script (inside the game’s main loop).
After the player’s turn is finish, we will check whether it is not yet game over (“gameover” = 0). If it is not yet game over, we will increment the “Score“.
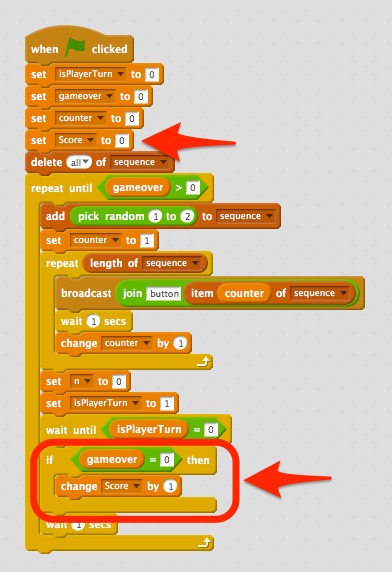
Updated main loop with score
Next we will handle game over. There are many things you can do for this. For now, we will just show a text with the word “Game Over” and play a simple sound.
Create a new sprite for the word Game Over. You can enlarge it when you put it on the stage.
Game Over sprite
The first thing we need to do with this sprite is hide it when the game starts. So on this sprite script, put the hide block under when green flag click.
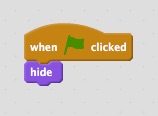
Hide Game Over sprite when game starts
Next, we need to show it when the game is over. Now we can detect whether the game is over by checking the value of “gameover” variable over and over again on this sprite’s script. But this will be consuming processing power unnecessarily. A better way is to use broadcast from the main script to tell this “Game Over” sprite to show itself when the game ends.
So, on this sprite’s script add the following.

Show Game Over sprite
And let’s add broadcast “gameover” message at the end of the main script (on stage script window), just after the main loop. (When the program exits the loop, it means game is already over).
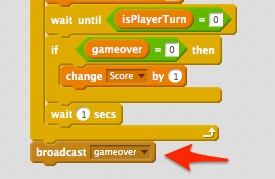
Broadcast “gameover” to show the Game Over sprite
At this point, the game is playable. Don’t forget to hide the display of all the variables except the “Score“.
Conclusion
Now it’s time for you to customize the game to your own liking and creativity. There are many things you can change to improve the game, such as:
- Create a nice background for the stage
- Change the buttons to different shapes
- Animate the buttons differently
- Show messages between each turn (e.g. show “Your turn” message when it’s the player’s turn)
- Add the number of buttons to increase difficulty
- Change the scoring system (e.g. change the increment of the score depending on the number of buttons played)
- and so many others.
I do hope that you have enjoyed the process of creating the game as well as playing it, or giving it to others to play, or even teaching others to create it. Let me know in the comment if I can improve this tutorial.
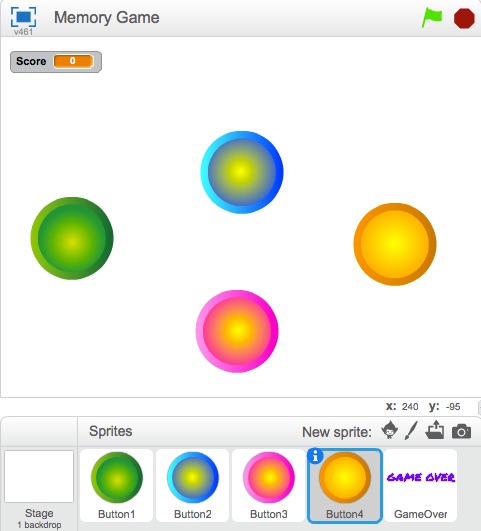
The completed game
